Back during my Freshman year of college, my very first drink ever was a shot of Burnett's Vodka, room temperature, from a red solo cup, in a questionably cleaned dorm room. If you are unfamiliar with Burnett's, it's that stuff you find in big plastic jugs for $9.99 at discount liquor stores that easily overlook suspicious IDs. I'm sure it would do a better job at cleaning glass than it would be as a drinking spirit. Anyways, I didn't know better so at the time, so I thought "huh, this isn't horrible." The (many) times I drank the stuff after that first run-in were less and less enjoyable. I realized that unless I managed to pour and swallow with the smallest amount of tongue contact, I would feel like Hades himself was having Samba night in my mouth.
7 years later, I'm happy to say I have since graduated to more reputable hard alcohols than the plastic jug choices of my college self. The bar at my apartment now houses a broad but carefully chosen selection of alcohols. So maybe now you're building up your own first collection - What should you get? What should you skip? How much should you get? Let's take a look deeper.
7 years later, I'm happy to say I have since graduated to more reputable hard alcohols than the plastic jug choices of my college self. The bar at my apartment now houses a broad but carefully chosen selection of alcohols. So maybe now you're building up your own first collection - What should you get? What should you skip? How much should you get? Let's take a look deeper.
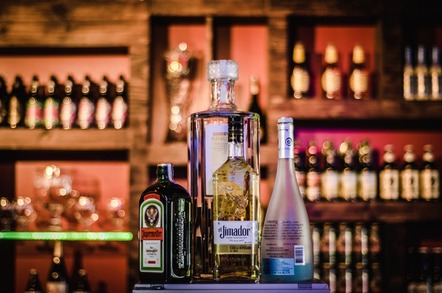
The Alcohol
Think of your bar as if you were a painter and you're starting to select your paints. Combining different colours will create interesting new hues, some more aesthetically pleasing than others. Alcohol and cocktails work on a similar principal. Mix appropriately and you'll end up with some pretty beautiful things. If you're beginning with a blank slate, you want to keep a few things in mind then when you begin shopping for your first bar -
1. What Do you Enjoy Drinking?
I'm going to assume you are of legal drinking age and have developed some preferences over the years. While it may seem obvious, one of the main things you should use to guide your choices is what you drink most often. Take a moment and write down a list of what you go for - at parties, at bars, at Thanksgiving dinner to avoid talking to your aunt, wherever.
Look up the recipes for your favorite drinks, see what liquors you consume most often, and rank them. Not sure of what you like or just need a reminder? Check out Liquor.com and get inspired.
2. How Many Liquors Do You Need?
When you build your bar, it may be tempting to by all sorts of fun, special alcohols you see at the store, but, at the end of the day, I would recommend starting with what you will be using the most. Some of the most common liquors that you will run into will get you through most of your drinking needs and also satisfy most people when it comes to party time and entertaining.
The classic base spirits include:
There are plenty of varieties and variants for each of the above of course, but we're just getting started here so let's not get bogged down in the details.
3. How much are you willing to spend?
Alcohol can range from cheap to absurdly expensive, so keep that in mind when building your bar. If you are just starting, you probably don't need to get top-shelf liquor unless you want to spend a small fortune or have the means to. If you have a lot of parties, stick to mid-range, popular liquors (Think the Smirnoff's and Jack Daniels of the world) which people will like but not cost a full paycheck.
If you are an aspiring cocktail connoisseur or plan to do a lot of craft cocktail experimentation, consider spending more on higher-end liquors for yourself but not necessary what you set out for house parties unless you want to. Keep the fancy stuff in your room or (literally) on the top shelf in your kitchen.
Think of your bar as if you were a painter and you're starting to select your paints. Combining different colours will create interesting new hues, some more aesthetically pleasing than others. Alcohol and cocktails work on a similar principal. Mix appropriately and you'll end up with some pretty beautiful things. If you're beginning with a blank slate, you want to keep a few things in mind then when you begin shopping for your first bar -
1. What Do you Enjoy Drinking?
I'm going to assume you are of legal drinking age and have developed some preferences over the years. While it may seem obvious, one of the main things you should use to guide your choices is what you drink most often. Take a moment and write down a list of what you go for - at parties, at bars, at Thanksgiving dinner to avoid talking to your aunt, wherever.
Look up the recipes for your favorite drinks, see what liquors you consume most often, and rank them. Not sure of what you like or just need a reminder? Check out Liquor.com and get inspired.
2. How Many Liquors Do You Need?
When you build your bar, it may be tempting to by all sorts of fun, special alcohols you see at the store, but, at the end of the day, I would recommend starting with what you will be using the most. Some of the most common liquors that you will run into will get you through most of your drinking needs and also satisfy most people when it comes to party time and entertaining.
The classic base spirits include:
- Vodka
- Rum
- Whisky
- Tequila
- Gin
There are plenty of varieties and variants for each of the above of course, but we're just getting started here so let's not get bogged down in the details.
3. How much are you willing to spend?
Alcohol can range from cheap to absurdly expensive, so keep that in mind when building your bar. If you are just starting, you probably don't need to get top-shelf liquor unless you want to spend a small fortune or have the means to. If you have a lot of parties, stick to mid-range, popular liquors (Think the Smirnoff's and Jack Daniels of the world) which people will like but not cost a full paycheck.
If you are an aspiring cocktail connoisseur or plan to do a lot of craft cocktail experimentation, consider spending more on higher-end liquors for yourself but not necessary what you set out for house parties unless you want to. Keep the fancy stuff in your room or (literally) on the top shelf in your kitchen.
The Hardware
A bar is more than just the alcohol. Part of having is a bar is having the proper tools to make drinks well beyond just a two ingredient booze+mixer. There are really only 5 things you should get to complete the hardware pieces for your bar.
A bar is more than just the alcohol. Part of having is a bar is having the proper tools to make drinks well beyond just a two ingredient booze+mixer. There are really only 5 things you should get to complete the hardware pieces for your bar.
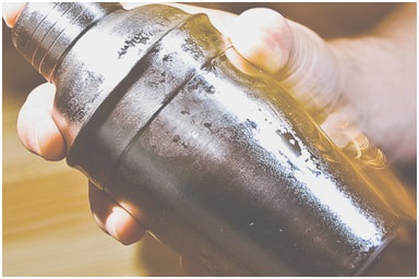
1. Shaker/Strainer
A cocktail shaker has a function beyond looking pretty on a shelf. There are two main varieties, the "Classic" shaker which has the strainer built in on the top, and a Boston Shaker which many pros typically use and is little more than two well-fitting cups that insert into one another. if you go the Boston route, you will likely also want a cocktail strainer as well as it doesn't have the built-in strainer.
While there are many snobs out there that swear by the Boston Shaker, the more common and easy to find "Classic" shaker works just fine. All metal shakers are easy to find, affordable, and work well. Seriously though, check out Target, Walmart, or even the Dave and Busters' prize section.
2. Bar Spoon
It's basically a very long, narrow stemmed spoon with a small spoon on one end and sometimes a small fork on the other. The fork end can help grab things out of jars (think olives from a tall jar) and the small spoon is to do uh... spoon things. It helps to mix ingredients in tall cups plus you look pretty cool using it.
3. Jigger/Pony Combo or Double Jigger
You know that fancy looking two-ended cup where one side is slightly larger than the other? Well that has a name beyond "Measuring Cup Thing" and that is a Jigger & Pony or a Double Jigger. A Jigger measures 1.5 oz while a Pony measures 1 oz. If you dive into more detailed cocktail making, things start getting very specific and precise, so this helps keep everything in check.
4. Muddler
It looks either like a small baseball bat or a really small torture device but its purpose is actually pretty straight forward - it's designed to crush and break up ingredients that you want to extract flavours from. Think crushing and grinding mint and sugar for a mojito or crushing strawberries for a fruity margarita. It may seem silly at first but once you start using it, you will start muddling everything, no innuendo implied.
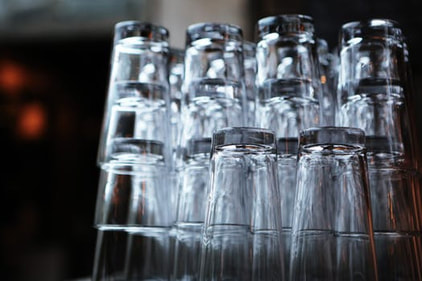
5. Glassware
Yes that eclectic collection of cups from bars, restaurants, and even the dining hall may work to hold liquids, but if you want a baller looking bar, go to IKEA or Homegoods and get yourself a set of glass cups for your drinks. A set of Old Fashioned glasses and highball glasses is a great starting point. If you want the specialty glasses like martini glasses and champagne flutes, be my guest.
Yes that eclectic collection of cups from bars, restaurants, and even the dining hall may work to hold liquids, but if you want a baller looking bar, go to IKEA or Homegoods and get yourself a set of glass cups for your drinks. A set of Old Fashioned glasses and highball glasses is a great starting point. If you want the specialty glasses like martini glasses and champagne flutes, be my guest.
The Finishing Touches
So you have your liquors and hardware, what is the last thing you need? That will be the mixers and enhancers to give your drinks their distinct flavours and character.
1. Mixers
Sodas, juices, seltzer, and many alcoholic and non-alcoholic beverages fall into this category. These make up the bulk of many drinks so keep on hand what you enjoy the most.
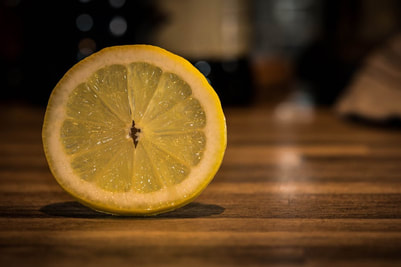
2. Citrus
Something that has become a staple in my house is to keep a selection of citrus on hand to add a spark of acid and brightness to any variety of drinks. This includes squeezing some lemon into a Jack and Coke or juicing up some limes for margaritas. Citrus plays a large role in many drinks so keeping some lemons, limes, and oranges on hand is not only cheap and easy, but can really elevate your bar game.
Keep in mind there is more to the citrus than just the juice. The rind has a ton of flavour and oils which can add a citrus note to drinks without the acid. You just want the rind and not the white pith which can be bitter. If you need a strip of rind for a martini or old fashioned, I recommend using a vegetable peeler to get a nice strip of rind.
3. Ice
You know if the water in your area tastes terrible or great, so when you are making drinks, remember that any ice you use will transfer flavour to the drink itself. If you are happy with the quality of the water in your locale, then feel free to use the ice from your ice maker or freeze it yourself. If not, however, consider freezing filtered water from your Brita or consider just picking up a bag of Reddy-Ice from your local gas station or 7-11. Seriously, that stuff costs like $2 and tastes like NOTHING which is exactly what you want. If you're hosting a big party, I would buy a bag anyway because if hosting dozens of parties in the past has taught me anything, it's that people are greedy as heck with ice and that few things can be as disappointing than room temperature drinks because you ran out of ice.
Displaying Your New Found Classiness
Part of the benefits of owning a full bar set and assortment of alcohols is displaying it proudly for your guest to Oooo and Ahhh over. You can go old school and get an actual bar cart. It can be a great accent piece but it is a very specific piece of furniture that can give your space a bit of a retro vibe.
Part of the benefits of owning a full bar set and assortment of alcohols is displaying it proudly for your guest to Oooo and Ahhh over. You can go old school and get an actual bar cart. It can be a great accent piece but it is a very specific piece of furniture that can give your space a bit of a retro vibe.
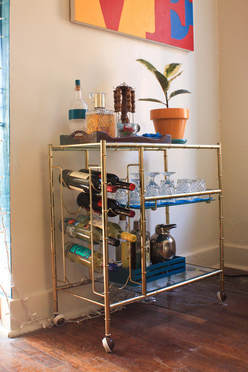
An alternative is more of a modern bar in the form of a shelved buffet table. This types of table is typically larger but can serve multiple purposes in your home beyond just proudly displaying that you have good taste when getting drunk. Dedicate part of the buffet to displaying your barware, some for your liquors and wines, some for glasses, and the rest can be for whatever you would like - cookbooks, plates, a teapot, that figurine grandma gifted to you 5 years ago, whatever.
Alright - I'm not going to end this post without giving you a drink to try out. This drink came about after I went on a Negroni kick earlier this summer which then led to me wanting to try something a little different. What I settled on was the Boulevardier (bool-eh-var-dee-ayy) - which is a variation of the Negroni except you use whiskey instead of gin. If you're a whiskey lover like me, try this out for a sweeter, refreshing drink that will get your appetite going all year round. My version goes a little heavier on the vermouth and orange than most which usually is equal parts of all 3 alcohols.
Alright - I'm not going to end this post without giving you a drink to try out. This drink came about after I went on a Negroni kick earlier this summer which then led to me wanting to try something a little different. What I settled on was the Boulevardier (bool-eh-var-dee-ayy) - which is a variation of the Negroni except you use whiskey instead of gin. If you're a whiskey lover like me, try this out for a sweeter, refreshing drink that will get your appetite going all year round. My version goes a little heavier on the vermouth and orange than most which usually is equal parts of all 3 alcohols.
Recipe: Boulevardier
Ingredients
Directions:
Cheers!
Ingredients
- 1.25oz Sweet Vermouth
- 1oz Whiskey
- 1oz Campari
- 1 thin slice Orange or Large piece of orange rind
- Ice
Directions:
- Lightly muddle the orange slice in the bottom of an old fashioned glass
- Add plenty of ice in the glass and pour in vermouth, whiskey, and Campari
- Stir 50 times to mix and chill - strain if you would like into a chilled glass or enjoy as is on the rocks
Cheers!
