But autumn is here, the flannel is being pulled out from the backs of closets, and Starbucks is parading their pumpkin based treats, so we can officially start roasting again without guilt. For me, one of the most quintessential autumn dishes is a perfectly roast chicken with vegetables and crusty bread. Not only is it delicious, but it’s also impressive to look at, and is an extremely affordable way to feed a small group (often for less than $10). So to welcome the new (and best) season, let’s tackle our next back to basics topic: Roast Chicken.
So what makes roasted food just taste so comforting, warm, and well, good? Well, it’s because of our friends caramelization and the maillard reaction. I’m not going to go in depth into this (for that, this Serious Eats post covers things quite well) but to simplify things, these are the two fundamental reactions happening that make roasted and browned food taste so good. When certain amino acids, protein, and sugars break down under high heat, they change structure to cause not only the beautiful browning that makes food look so appealing, but also create new flavours and aromas that were not there before. Think about the difference between poached and fried eggs - the browning and distinct flavors that are present in a fried egg are largely in part due to the Maillard reaction.
So when we roast, we are promoting a few things - effective browning and introduction of new flavors and aromas. When looking specifically at a roast chicken, we are also looking to promote the rendering of fat to help crisp the skin and introduce new textures. Where the skill comes in then is effectively balancing browning while making sure our meat is fully cooked through without drying things out. So how do we do that?
There are a few things we can do to make sure our chicken is cooked thoroughly and have a nice, brown crispy skin without it drying out.
The first is making sure we are using high enough heat to promote effective browning. You will notice in this recipe we take steps to raise the heat through the cooking process to make sure the meat is fully cooked first and then raising the heat to get that browning at the end. Think of this as a similar process to reverse-searing a steak (my preferred way to cook a steak just FYI).
The second thing we can do is to make sure the meat cooks as quickly as possible so that we align peak chicken doneness with peak delicious browning. If a chicken can cook quicker, we will have less chance of drying out the meat as we wait for the skin to crisp. We will achieve this by spatchcocking the chicken. As much as it sounds like a medieval torture device (and to be honest, it’s not the most gentle procedure to the chicken just so you can brace yourselves), it will let the chicken cook more quickly as well as make it easier to serve.
Alright, I am not going to try to describe in words what is much easier understood via a quick 4 minute video, but to prep your chicken for roasting, I recommend spatchcocking your bird. What is spatchcocking? Basically, you are removing the backbone of your bird so that it can lay flat while cooking. Why would you want to do this exactly? Flattening your bird gives more surface area to get in contact with your pan and thus could help your bird cook more quickly. Plus, when it comes time to cut and serve your chicken, it makes easier to quarter your chicken and separate the leg and thigh from the breast and wing portion.
So now that that’s taken care of, here’s the 4 minute video I promised which shows how to spatchcock your chicken. Take good notes now y’all.
Now that your chicken is nice and flat, the next most important thing is to season your bird generously before roasting. Luckily, this part is quite simple as long as you remind yourself to keep things simple.
For a classic roast chicken, I don’t like to get too wild with introducing half a dozen flavors and spices, but instead prefer two of chicken’s dear friends: lemon and thyme. You will want fresh lemon and thyme sprigs for this, so if you can find it, seek out fresh herbs in your supermarket.
To begin, on a half sheet pan or large baking sheet, drizzle olive oil on the bottom and introduce your chicken, which you have patted down and dried with some paper towels. Why dry your chicken? Well as you probably know from elementary school science class, water and oil don’t mix. So drying the skin will let the oil get direct contact with the skin and help it crisp. The oil will also be a medium to get flavor to your chicken. So dry it out!
Drizzle a little extra olive oil on top of your chicken and give it a nice little massage, getting oil evenly on the exterior of your bird. You don’t want so much oil that it’s dripping, but just enough so that it shines. Once that is done, it’s time to add your first layer of seasoning - salt and pepper. A piece of advice - a 5ish pound bird can easily take 1 tablespoon of salt and a generous amount of pepper, so when seasoning, get generous with the salt and pepper and rub it in so it’s in all the nooks and crannies of the outside of your chicken. Also remember to not just season the skin-side of your chicken, but also season the “inside” of the chicken on the opposite side. No sides left unseasoned!
Once your chicken is salted and peppered, we’ll introduce the lemon and thyme. Under the chicken on the sheet pan, lay out your thinly sliced lemon and a few whole sprigs of thyme and lay your chicken on top. On the skin side, pluck the leaves from 4-5 sprigs of thyme and sprinkle evenly. Feel free to place some whole springs on as well. It won’t hurt.
If you’ve managed to make it this far into this post on how to roast a chicken, 1. I’m so proud of you, and 2. We’re finally at the last step!
Roasting is something done at pretty high heat, so once your bird is all ready, make sure your oven is up to temperature and ready to rock. I like to do two steps when roasting a chicken - starting it at 400 degrees to cook the chicken through, and then finishing the chicken at the very end at a higher temp to ensure that perfect golden brown exterior and crisp skin.
For a 5-6 pound bird, it will take approximately 45 minutes at 400 degrees and then increasing the temperature to 450 degrees for an additional 15-20 minutes or so to finish cooking and brown the skin perfectly.
When is it done? I like to employ an instant-read thermometer and check the chicken at a few locations - the thickest part of the thigh and the breast and target a temperature of 160 degrees. Remember, when we remove the chicken from the oven and let it rest, it will continue to rise another 5 or so degrees.
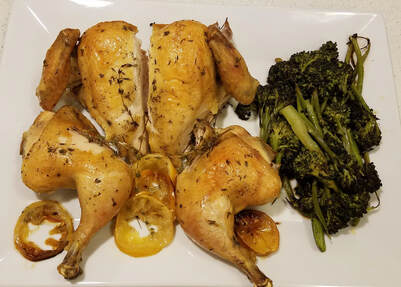
Since your spatchcocked your chicken, cutting and serving it is as simple and dividing the chicken right down the middle between the two breasts and then separating the thigh and drumstick. Just be careful to not tear the skin too much - a sharp chef’s knife is your friend here.
A delicious roast chicken only needs simple sides to make a perfect full meal. And luckily, almost anything is fair game to serve alongside it. Mashed potatoes? Sure! A salad? Why Not? Roasted veggies? Of course!
The only thing I usually recommend having on hand no matter what is some kind of crusty bread available to soak up any chicken juice and drippings.
What if you want a sauce? If you insist on having something to dip your chicken in, I recommend this simple sauce - Combine ¼ cup mayo,1 tsp dijon mustard, ½ tsp of lemon juice, and 1 tablespoon of chicken drippings from the sheet pan. Just stir together well and you have a rich, tasty sauce that takes only a minute to prepare.
Alright - that’s enough chicken talk for one day. I hope you can now see that roasting a chicken is not nearly as daunting as it may seem up front. It’s an easy way to feed and crowd and you can even save some money by buying your chicken whole and doing a little butchery on your own. Now go forth and get roasting. Fall is here.
Serves: 3-4
Ingredients:
- 1 5-6 pound whole chicken
- 1 lemon, thinly sliced
- 1 package fresh thyme (10-15 sprigs)
- 1 bunch broccolini (about ¾-1 pound), thick stalks split lengthwise
- Olive Oil
- Salt
- Pepper
Directions:
- Preheat your oven to 400 degrees
- Spatchcock your chicken and pat it dry with paper towels
- Drizzle a sheet pan with 1-2 tablespoons olive oil and add the chicken. Add a little more oil and massage the skin and opposite side of your bird with oil
- Season generously with salt and pepper and rub it in evenly onto the chicken
- Lay lemon slices and 4-5 sprigs of thyome on sheet tray and place the chicken skin side up on top
- Pluck the leaves from 5-7 sprigs of thyme and sprinkle evenly on the skin side of the chicken
- Place sheet pan into the 400 degree oven and roast for about 45 minutes
- In a large bowl, add broccolini and drizzle 2 tablespoons olive oil and a generous sprinkle of salt and pepper and toss to coat
- Add the broccolini on either side of the chicken on the sheet pan
- Return the chicken and tray to the oven and raise heat to 450 degrees
- Roast for an additional 15 minutes - chicken should be well browned and broccolini cooked
- Check if the chicken is ready using an instant read thermometer in the thigh and the thickest part of the breast. Target 160 degrees. (If not ready yet, remove broccolini and reduce heat back to 400 and check the chicken every 5 minutes or so until at target temp)
- Remove broccolini to a serving tray and rest chicken for 5 minutes before dividing and serving
- Enjoy with the sides of your choice and plenty of bread and butter


